 https://ffc.com/wp-content/uploads/2020/05/How-To-Find-The-Perfect-Workout-For-You-On-FFC-On-Demand.png
1400
2280
Sydney Meyer
https://ffc.com/images/Best-Gym.png
Sydney Meyer2020-05-22 10:34:062020-05-22 10:34:06How To Find The Perfect Workout For You On FFC On Demand
https://ffc.com/wp-content/uploads/2020/05/How-To-Find-The-Perfect-Workout-For-You-On-FFC-On-Demand.png
1400
2280
Sydney Meyer
https://ffc.com/images/Best-Gym.png
Sydney Meyer2020-05-22 10:34:062020-05-22 10:34:06How To Find The Perfect Workout For You On FFC On Demand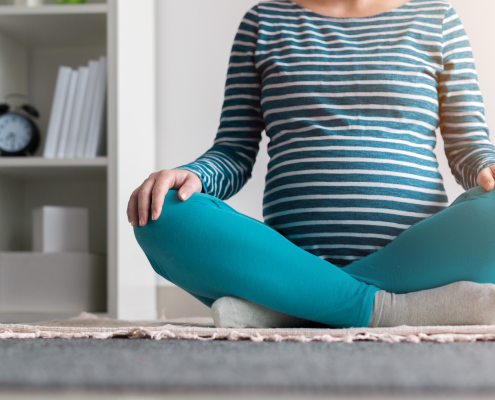 https://ffc.com/wp-content/uploads/2020/05/Our-6-Favorite-At-Home-Exercises-For-Pregnant-Women.png
1400
2280
Sydney Meyer
https://ffc.com/images/Best-Gym.png
Sydney Meyer2020-05-13 13:40:182020-05-13 13:40:18Our 6 Favorite At-Home Exercises For Pregnant Women
https://ffc.com/wp-content/uploads/2020/05/Our-6-Favorite-At-Home-Exercises-For-Pregnant-Women.png
1400
2280
Sydney Meyer
https://ffc.com/images/Best-Gym.png
Sydney Meyer2020-05-13 13:40:182020-05-13 13:40:18Our 6 Favorite At-Home Exercises For Pregnant Women https://ffc.com/wp-content/uploads/2020/04/Sore-From-Your-At-Home-Workouts.png
1400
2280
Sydney Meyer
https://ffc.com/images/Best-Gym.png
Sydney Meyer2020-04-21 15:39:572020-04-21 15:39:57Sore From Your At-Home Workout? Try These Physical Therapist-Approved Stretches
https://ffc.com/wp-content/uploads/2020/04/Sore-From-Your-At-Home-Workouts.png
1400
2280
Sydney Meyer
https://ffc.com/images/Best-Gym.png
Sydney Meyer2020-04-21 15:39:572020-04-21 15:39:57Sore From Your At-Home Workout? Try These Physical Therapist-Approved Stretches https://ffc.com/wp-content/uploads/2020/04/Breaking-Up-Your-Daily-Fitness.png
1400
2280
Sydney Meyer
https://ffc.com/images/Best-Gym.png
Sydney Meyer2020-04-17 10:39:242020-04-17 10:39:24Breaking Up Your Daily Fitness
https://ffc.com/wp-content/uploads/2020/04/Breaking-Up-Your-Daily-Fitness.png
1400
2280
Sydney Meyer
https://ffc.com/images/Best-Gym.png
Sydney Meyer2020-04-17 10:39:242020-04-17 10:39:24Breaking Up Your Daily Fitness https://ffc.com/wp-content/uploads/2020/03/turn-your-binge-watching-into-a-workout-with-these-fun-challenges.png
1400
2280
Sydney Meyer
https://ffc.com/images/Best-Gym.png
Sydney Meyer2020-03-24 12:15:052020-03-24 12:15:05Turn Your Binge Watching Into A Workout With These Fun Challenges
https://ffc.com/wp-content/uploads/2020/03/turn-your-binge-watching-into-a-workout-with-these-fun-challenges.png
1400
2280
Sydney Meyer
https://ffc.com/images/Best-Gym.png
Sydney Meyer2020-03-24 12:15:052020-03-24 12:15:05Turn Your Binge Watching Into A Workout With These Fun Challenges https://ffc.com/wp-content/uploads/2020/03/lower-your-risk-blog-post.png
1400
2280
Sydney Meyer
https://ffc.com/images/Best-Gym.png
Sydney Meyer2020-03-09 15:29:182020-03-09 15:29:18Learn How To Lower Your Risk For Breast And Ovarian Cancer With Regular Exercise
https://ffc.com/wp-content/uploads/2020/03/lower-your-risk-blog-post.png
1400
2280
Sydney Meyer
https://ffc.com/images/Best-Gym.png
Sydney Meyer2020-03-09 15:29:182020-03-09 15:29:18Learn How To Lower Your Risk For Breast And Ovarian Cancer With Regular Exercise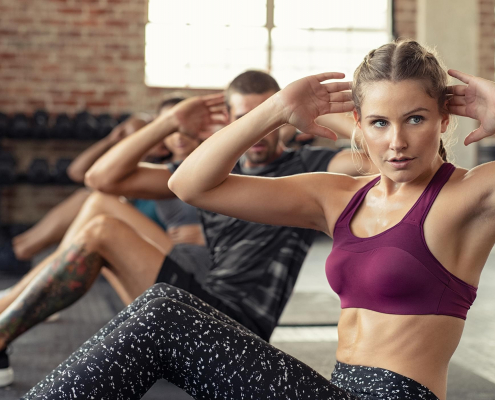 https://ffc.com/wp-content/uploads/2020/02/demo-hero-2-min.jpg
1400
2280
Sydney Meyer
https://ffc.com/images/Best-Gym.png
Sydney Meyer2020-02-28 09:15:312020-02-28 09:15:315 Common Form Mistakes Experts See In HIIT Classes
https://ffc.com/wp-content/uploads/2020/02/demo-hero-2-min.jpg
1400
2280
Sydney Meyer
https://ffc.com/images/Best-Gym.png
Sydney Meyer2020-02-28 09:15:312020-02-28 09:15:315 Common Form Mistakes Experts See In HIIT Classes https://ffc.com/wp-content/uploads/2019/12/Smart-Aging.jpg
960
1440
Sydney Meyer
https://ffc.com/images/Best-Gym.png
Sydney Meyer2020-01-30 08:00:102020-01-30 08:00:10Smart Aging: Three Quick Tests to Assess Your Strength and Flexibility
https://ffc.com/wp-content/uploads/2019/12/Smart-Aging.jpg
960
1440
Sydney Meyer
https://ffc.com/images/Best-Gym.png
Sydney Meyer2020-01-30 08:00:102020-01-30 08:00:10Smart Aging: Three Quick Tests to Assess Your Strength and Flexibility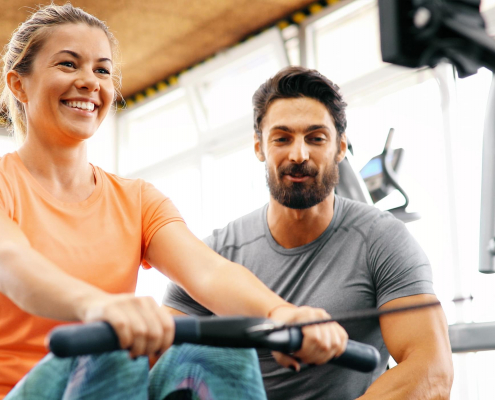 https://ffc.com/wp-content/uploads/2019/11/personal-trainer-2280x1400-3.jpg
1400
2280
Sydney Meyer
https://ffc.com/images/Best-Gym.png
Sydney Meyer2019-11-07 13:18:212019-11-07 13:18:21Why I Work With a Personal Trainer
https://ffc.com/wp-content/uploads/2019/11/personal-trainer-2280x1400-3.jpg
1400
2280
Sydney Meyer
https://ffc.com/images/Best-Gym.png
Sydney Meyer2019-11-07 13:18:212019-11-07 13:18:21Why I Work With a Personal Trainer https://ffc.com/wp-content/uploads/2019/09/Getting-Back-Into-A-Gym-Routine-FFC-Fitness-Chicago.jpg
700
1140
Sydney Meyer
https://ffc.com/images/Best-Gym.png
Sydney Meyer2019-09-25 15:27:382019-09-25 15:27:383 No-Fail Tips to Get Back into Your Gym Routine
https://ffc.com/wp-content/uploads/2019/09/Getting-Back-Into-A-Gym-Routine-FFC-Fitness-Chicago.jpg
700
1140
Sydney Meyer
https://ffc.com/images/Best-Gym.png
Sydney Meyer2019-09-25 15:27:382019-09-25 15:27:383 No-Fail Tips to Get Back into Your Gym Routine https://ffc.com/wp-content/uploads/2019/09/Staying-Healthy-While-Traveling-Wellness-Chicago-FFC.jpg
700
1140
Sydney Meyer
https://ffc.com/images/Best-Gym.png
Sydney Meyer2019-09-25 11:42:392019-09-25 11:42:39Strong Mind | Strong Body #4: Staying Healthy While Traveling
https://ffc.com/wp-content/uploads/2019/09/Staying-Healthy-While-Traveling-Wellness-Chicago-FFC.jpg
700
1140
Sydney Meyer
https://ffc.com/images/Best-Gym.png
Sydney Meyer2019-09-25 11:42:392019-09-25 11:42:39Strong Mind | Strong Body #4: Staying Healthy While Traveling https://ffc.com/wp-content/uploads/2019/09/10-Minute-Workout-For-Beginners-FFC-Fitness-Chicago.jpg
700
1140
Sydney Meyer
https://ffc.com/images/Best-Gym.png
Sydney Meyer2019-09-19 16:43:532019-09-19 16:43:5310 Minute Workout for Beginners: It’s Easier to Fit In Than You Think
https://ffc.com/wp-content/uploads/2019/09/10-Minute-Workout-For-Beginners-FFC-Fitness-Chicago.jpg
700
1140
Sydney Meyer
https://ffc.com/images/Best-Gym.png
Sydney Meyer2019-09-19 16:43:532019-09-19 16:43:5310 Minute Workout for Beginners: It’s Easier to Fit In Than You Think https://ffc.com/wp-content/uploads/2019/09/4.png
1400
2800
Sydney Meyer
https://ffc.com/images/Best-Gym.png
Sydney Meyer2019-09-18 15:57:432019-09-18 15:57:43Sports Fitness Training: Ballistic Training & Plyometrics to Bridge the Gap Between the Gym & Court
https://ffc.com/wp-content/uploads/2019/09/4.png
1400
2800
Sydney Meyer
https://ffc.com/images/Best-Gym.png
Sydney Meyer2019-09-18 15:57:432019-09-18 15:57:43Sports Fitness Training: Ballistic Training & Plyometrics to Bridge the Gap Between the Gym & Court https://ffc.com/wp-content/uploads/2019/09/Finding-Balance-In-Fitness-Work-Life-Fitness-Chicago-FFC.jpg
700
1140
Sydney Meyer
https://ffc.com/images/Best-Gym.png
Sydney Meyer2019-09-18 10:43:402019-09-18 10:43:40Strong Mind | Strong Body #3: Finding Balance in Fitness, Work, School & Life
https://ffc.com/wp-content/uploads/2019/09/Finding-Balance-In-Fitness-Work-Life-Fitness-Chicago-FFC.jpg
700
1140
Sydney Meyer
https://ffc.com/images/Best-Gym.png
Sydney Meyer2019-09-18 10:43:402019-09-18 10:43:40Strong Mind | Strong Body #3: Finding Balance in Fitness, Work, School & Life https://ffc.com/wp-content/uploads/2019/09/Airport-Yoga-101.jpg
1000
1500
Sydney Meyer
https://ffc.com/images/Best-Gym.png
Sydney Meyer2019-09-06 16:50:512019-09-06 16:50:51Airport Yoga 101
https://ffc.com/wp-content/uploads/2019/09/Airport-Yoga-101.jpg
1000
1500
Sydney Meyer
https://ffc.com/images/Best-Gym.png
Sydney Meyer2019-09-06 16:50:512019-09-06 16:50:51Airport Yoga 101 https://ffc.com/wp-content/uploads/2019/09/How-To-Pick-The-Best-Classes-At-The-Gym-And-Set-Up-A-Workout-Schedule-FFC-Fitness-Chicago.jpg
1000
1500
Sydney Meyer
https://ffc.com/images/Best-Gym.png
Sydney Meyer2019-09-05 09:51:172019-09-05 09:51:17How to Choose the Best Classes at the Gym
https://ffc.com/wp-content/uploads/2019/09/How-To-Pick-The-Best-Classes-At-The-Gym-And-Set-Up-A-Workout-Schedule-FFC-Fitness-Chicago.jpg
1000
1500
Sydney Meyer
https://ffc.com/images/Best-Gym.png
Sydney Meyer2019-09-05 09:51:172019-09-05 09:51:17How to Choose the Best Classes at the Gym https://ffc.com/wp-content/uploads/2019/08/How-I-Found-My-Passion-For-Bodybuilding-FFC-Fitness-Chicago.jpg
700
1140
Sydney Meyer
https://ffc.com/images/Best-Gym.png
Sydney Meyer2019-08-15 16:07:362019-08-15 16:07:36Strong Mind | Strong Body #1: How I Discovered My Passion for Bodybuilding
https://ffc.com/wp-content/uploads/2019/08/How-I-Found-My-Passion-For-Bodybuilding-FFC-Fitness-Chicago.jpg
700
1140
Sydney Meyer
https://ffc.com/images/Best-Gym.png
Sydney Meyer2019-08-15 16:07:362019-08-15 16:07:36Strong Mind | Strong Body #1: How I Discovered My Passion for Bodybuilding https://ffc.com/wp-content/uploads/2019/07/How-Does-KT-Tape-Work-Fitness-FFC-Chicago.jpg
700
1140
Sydney Meyer
https://ffc.com/images/Best-Gym.png
Sydney Meyer2019-08-09 21:21:302019-08-09 21:21:30How Does KT Tape Work & What Are Its Benefits?
https://ffc.com/wp-content/uploads/2019/07/How-Does-KT-Tape-Work-Fitness-FFC-Chicago.jpg
700
1140
Sydney Meyer
https://ffc.com/images/Best-Gym.png
Sydney Meyer2019-08-09 21:21:302019-08-09 21:21:30How Does KT Tape Work & What Are Its Benefits? https://ffc.com/wp-content/uploads/2019/08/Try-A-Manual-Treadmill-Heres-Why-You-Should-Check-Out-The-Woodway-Curve-For-Strength-And-Endurance-Formula-FFC-Chicago-Fitness.jpg
700
1140
Sydney Meyer
https://ffc.com/images/Best-Gym.png
Sydney Meyer2019-08-07 16:17:362019-08-07 16:17:36Try a Manual Treadmill: Here’s Why You Should Check Out the Woodway Curve for Strength & Endurance
https://ffc.com/wp-content/uploads/2019/08/Try-A-Manual-Treadmill-Heres-Why-You-Should-Check-Out-The-Woodway-Curve-For-Strength-And-Endurance-Formula-FFC-Chicago-Fitness.jpg
700
1140
Sydney Meyer
https://ffc.com/images/Best-Gym.png
Sydney Meyer2019-08-07 16:17:362019-08-07 16:17:36Try a Manual Treadmill: Here’s Why You Should Check Out the Woodway Curve for Strength & Endurance https://ffc.com/wp-content/uploads/2019/08/HIIT-Workouts-For-Beginners-Benefits-And-A-Plan-To-Try-Formula-FFC-Fitness-Chicago.jpg
700
1140
Sydney Meyer
https://ffc.com/images/Best-Gym.png
Sydney Meyer2019-08-05 16:52:202019-08-05 16:52:20HIIT Workouts for Beginners: Why Do HIIT & Sample Workout
https://ffc.com/wp-content/uploads/2019/08/HIIT-Workouts-For-Beginners-Benefits-And-A-Plan-To-Try-Formula-FFC-Fitness-Chicago.jpg
700
1140
Sydney Meyer
https://ffc.com/images/Best-Gym.png
Sydney Meyer2019-08-05 16:52:202019-08-05 16:52:20HIIT Workouts for Beginners: Why Do HIIT & Sample Workout